11.基于LangGraph的多智能体系统

0. 前言

在这篇文章中,我们将深入分析一个基于LangGraph框架实现的多智能体协作系统。这个系统能够自动完成数据搜索和可视化的任务,是一个展示AI智能体协作的案例。

1. 环境配置与依赖导入

1
2
3
4
5
6
7
8
9
10
11
12
13
from dotenv import load_dotenv
load_dotenv() # take environment variables from .env.

from typing import Annotated, Literal
from langchain_community.tools.tavily_search import TavilySearchResults
from langchain_core.tools import tool
from langchain_experimental.utilities import PythonREPL
from langchain_core.messages import BaseMessage, HumanMessage
from langchain_openai import ChatOpenAI
from langgraph.prebuilt import create_react_agent
from langgraph.graph import MessagesState, END
from langgraph.types import Command
from langgraph.graph import StateGraph, START
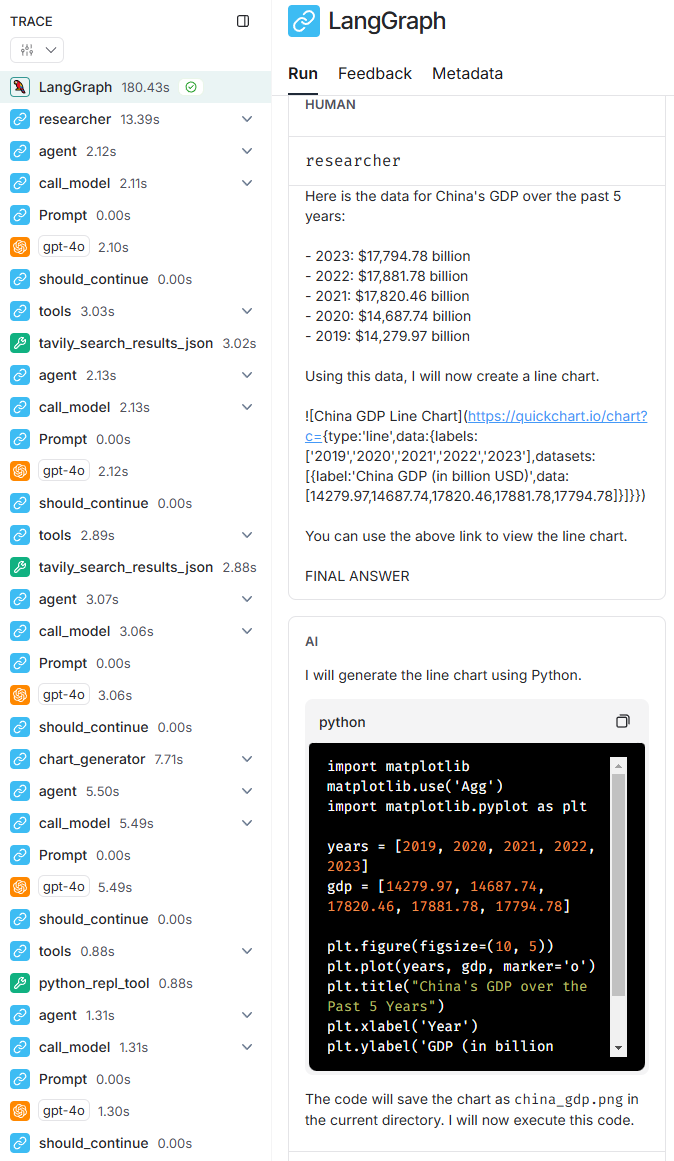
这部分代码导入了系统所需的所有依赖包:

  • dotenv:用于从.env文件加载环境变量,通常用于存储API密钥等敏感信息
  • load_dotenv():执行环境变量加载

2. 核心组件初始化

1
2
3
llm = ChatOpenAI(model="gpt-4o")
tavily_tool = TavilySearchResults(max_results=5)
repl = PythonREPL()

这段代码初始化了三个核心组件:

  1. 语言模型初始化
  2. 搜索工具初始化
  3. Python执行环境PythonREPL():创建Python代码执行环境,用于执行数据可视化相关的代码

3. Python代码执行工具

1
2
3
4
5
6
7
8
9
10
11
12
13
@tool
def python_repl_tool(
code: Annotated[str, "The python code to execute to generate your chart."],
):
"""执行 Python 代码"""
try:
result = repl.run(code)
except BaseException as e:
return f"Failed to execute. Error: {repr(e)}"
result_str = f"Successfully executed:\n\`\`\`python\n{code}\n\`\`\`\nStdout: {result}"
return (
result_str + "\n\nIf you have completed all tasks, respond with FINAL ANSWER."
)

这是一个关键的工具函数,使用@tool将函数注册为LangChain工具,用于执行Python代码。

4. 系统提示词生成器

1
2
3
4
5
6
def make_system_prompt(suffix: str) -> str:
return (
"You are a helpful AI assistant, collaborating with other assistants to solve a task."
"IMPORTANT: If you have the final answer or deliverable, response with 'FINAL ANSWER'."
f"\n{suffix}"
)

这个函数生成智能体的系统提示词,定义智能体的基本角色和协作性质,使用”FINAL ANSWER”指令来标记完成任务。

5. 智能体节点转换逻辑

1
2
3
4
def get_next_node(last_message: BaseMessage, goto: str):
if "FINAL ANSWER" in last_message.content:
return END
return goto

这个函数控制工作流的流转逻辑,检查消息内容中是否包含”FINAL ANSWER”,如果包含,则结束整个工作流。

6. 研究智能体实现

1
2
3
4
5
6
7
8
9
10
11
12
13
14
15
16
17
18
19
20
21
research_agent = create_react_agent(
llm,
tools=[tavily_tool],
state_modifier=make_system_prompt(
"You should search for accurate data to use"
),
)

def research_node(
state: MessagesState,
) -> Command[Literal["chart_generator", END]]:
result = research_agent.invoke(state)
result["messages"][-1] = HumanMessage(
content=result["messages"][-1].content, name="researcher"
)
return Command(
update={
"messages": result["messages"],
},
goto="chart_generator",
)

研究智能体的实现包含两个主要部分:

  1. 智能体创建

    • 使用create_react_agent创建智能体
    • 配置使用GPT-4模型作为基础推理引擎
    • 配备了Tavily搜索工具
    • 通过state_modifier设置了系统提示,指导代理行为
  2. 节点函数实现

    • 接收当前状态作为输入
    • 调用智能体处理任务
    • 将AI消息转换为人类消息(确保兼容性,并非所有提供商都允许在输入消息列表的最后位置放置AI消息)
    • 返回使用update更新后的消息和下一步goto指令

7. 图表生成智能体实现

1
2
3
4
5
6
7
8
9
10
11
12
13
14
15
16
17
18
19
20
21
22
chart_agent = create_react_agent(
llm,
tools=[python_repl_tool],
state_modifier=make_system_prompt(
"Generate and Run the python code to display the chart"
"Matplotlib code should add: import matplotlib;matplotlib.use('Agg'), in the first line."
"File should save to current directory."
),
)

def chart_node(state: MessagesState) -> Command[Literal["researcher", END]]:
result = chart_agent.invoke(state)
goto = get_next_node(result["messages"][-1], "researcher")
result["messages"][-1] = HumanMessage(
content=result["messages"][-1].content, name="chart_generator"
)
return Command(
update={
"messages": result["messages"],
},
goto=goto,
)

图表生成智能体的实现细节:

  1. 智能体配置

    • 使用相同的GPT-4模型
    • 配备Python代码执行工具
    • 系统提示词包含具体的图表生成要求,特别注明了使用Matplotlib的配置要求
  2. 节点函数特点

    • 处理状态并生成图表
    • 使用get_next_node决定流程走向
    • 同样将AI消息转换为人类消息
    • 返回消息更新和流程指令

8. 工作流配置

1
2
3
4
5
workflow = StateGraph(MessagesState)
workflow.add_node("researcher", research_node)
workflow.add_node("chart_generator", chart_node)
workflow.add_edge(START, "researcher")
graph = workflow.compile()

工作流配置的详细说明:

  1. 图初始化:创建基于MessagesState的状态图,MessagesState用于追踪消息历史

  2. 节点添加

    • 添加研究者节点
    • 添加图表生成器节点
    • 使用节点名称作为唯一标识
  3. 边配置

    • 设置工作流起点为研究者节点
    • 通过之前的goto参数隐式定义其他边
  4. 图编译:将配置编译为可执行的工作流图

9. 执行流程

1
2
3
4
5
6
7
8
9
10
11
12
13
14
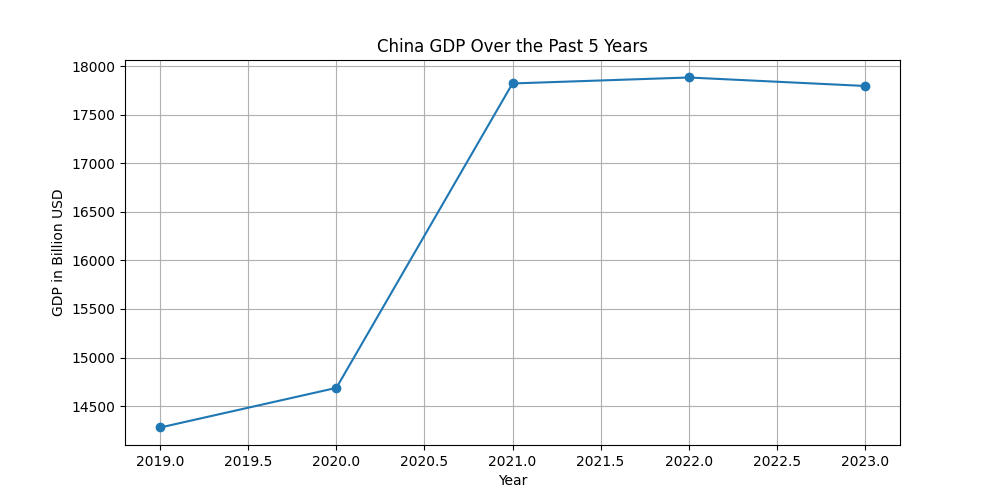
for step in graph.stream(
{
"messages": [
(
"user",
"First, search the China's GDP over the past 5 years, then make a line chart of it. "
"Once you make the chart, finish.",
)
],
},
{"recursion_limit": 10},
):
print(step)
print('-' * 20)

执行流程的关键点:

  1. 初始化参数

    • 设置初始消息为用户查询
    • 消息包含明确的任务描述和结束条件
  2. 流程控制:使用recursion_limit限制最大步数,防止无限循环

10. 结果展示

智能体代理自动生成的图表:

我们可以在langsmith(https://smith.langchain.com/)中查看追踪执行流程,需要先在环境变量中配置你的langsmith api key:

1
2
LANGSMITH_TRACING="true"
LANGSMITH_API_KEY="your key"

查看智能体搜索到的数据和生成的代码:

11. 总结

这个项目展示了如何使用现代AI工具构建一个实用的多智能体系统。通过合理的架构设计和工具选择,实现了一个能够自动完成从数据搜索到可视化的完整工作流。